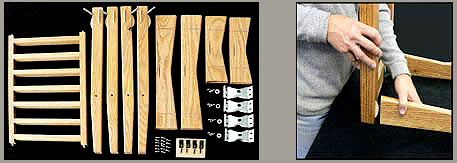


TABLE ASSEMBLY INSTRUCTIONS WITHOUT SHELF
1. Parts for assembling your table base. Top separate.
3. Fit corner brace over bolt and into slots on side board.
4. Place washer over bolt and thread wing nut on until it contacts corner brace. Do not tighten down the wing nut yet.
5. Continue with next leg and side board until all legs and sides are in place. Hand tighten wing nuts.
6. Set table base in upright position and check that sides and tops of legs are flush. If not, loosen wing nut slightly and move sides until flush. Re-tighten wing nuts.
7. Flip back over and insert screws through corner bracket and into the pre-drilled holes in the side boards and tighten.
8. Lay table top upside down & place table base on top. Center base on marks and insert top anchors into slots in sides.
9. Screw anchors into pre-drilled holes until snug. Do NOT over tighten screws. Carefully turn over your table as it can be heavy.
2. On a solid surface, place a side board on each side of one leg.
TABLE ASSEMBLY INSTRUCTIONS WITH SHELF
1. Gather up parts for assembling you table base with shelf. Top separate.
2. On solid surface place a side board on each side of one leg.
3. Orient shelf dowel holes inward towards long side boards.
4. Fit corner brace over bolt and into slots on side board.
5. Place washer over bolt and thread wing nut on until it contacts corner brace. Do NOT tighten down the wing nuts yet.
6. Continue with next leg and side board until all legs and sides are in place.
7. Place dowels on one side of shelf into holes on legs and then the other side. (You may have to loosen wing nuts slightly on brackets.) Be sure flat side of shelf is facing down, towards top of table.
8. Insert a 1-1/4" screw into each dowel hole on outside of leg and tighten until snug and shelf fits tight to legs. Place a button plug over the hole. Place a piece of wood over plug to prevent marring surface and tap into place.
9. Tighten wing nuts on corner brackets.
10. Set table base in upright position and check that sides and tops of legs are flush. If not, loosen wing nut slightly and move sides until flush and retighten wing nuts.
11. Insert screw through corner bracket and into the predrilled holes in the side boards and tighten screws.
12. Lay table top upside down and place table base on top. Center base on marks and insert top anchors into slots in sides.
13. Screw anchors into pre-drilled holes until snug. Do NOT over tighten screws.
14. Carefully turn over table as it can be heavy.
Any questions contact us 406-752-3361 email: info@buffalotrailartworks.com
If you have been shipped a table from us, most likely it's in several boxes, your top in one box shipped separately and the rest of the table legs, skirt and other parts in a second box. It will need some assembling. Here are directions on how to assemble your table, with a shelf and without a shelf. Don't hesitate to call or email us with any questions. Jim and Holly Cutting 406-752-3361 email: info@buffalotrailartworks.com
Copyright 2000-2022 Buffalo Trail Artworks


